Which no-code platforms export code in 2025?
Which no-code platforms export code in 2023? By James Virgo No-code is great for rapid app development, but no-code has been proven to be shockingly

20th April 2025
When building a software application that you want to sell to multiple customers, one of the key decisions to make is about which type of architecture to adopt. The choice of architecture will impact both the cost base for your business and how you store customer data.
The question of cost is most obviously important because it determines how profitable your SaaS business will be. Equally important is how you choose to store customer data since this will impact which clients are legally allowed to use your software.
Single-tenant and multi-tenant architectures are the two options to consider. Both types of architecture have security and privacy implications. There’s also the issue of cost, which differs significantly depending on which architecture you choose to adopt.
In this article, we’ll compare multi-tenant vs. single-tenant cloud architecture and how to implement both types of architecture, in the most cost-effective ways using Dittofi.
Single-tenant cloud architecture is one where a single software instance and its supporting infrastructure and database serve only one customer. In a single-tenant environment, all customer data and interactions are separate from every other customer. Customer data is not housed in the same database and there’s no sharing of data in any way.
Please note, a customer is not the same as a user. One customer will always be a single group of one or more users. For example, if you deploy your app at a school, the school will have one or more users of your app – students, teachers, parents and so on. Each user at one school will utilise the same software instance of your app, supporting infrastructure and database.
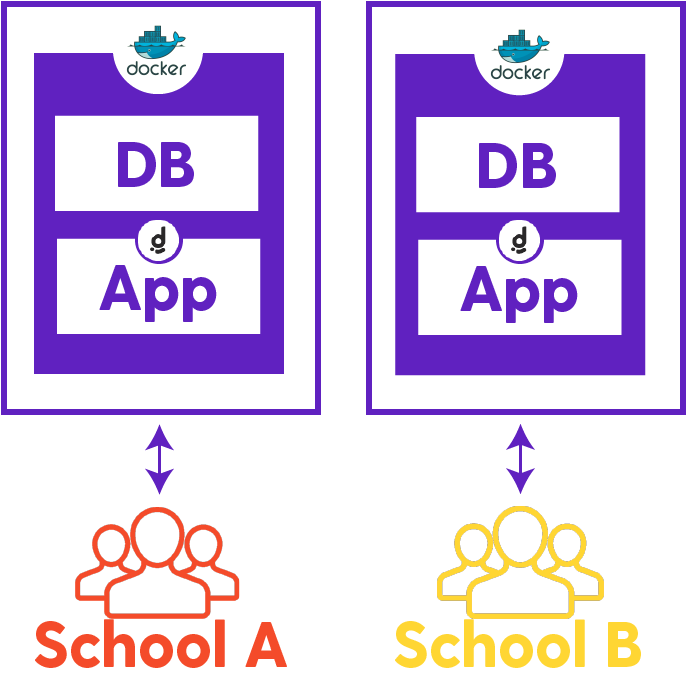
In the case of a single tenant app, you can deploy this app to multiple customers which might be, for example, two separate schools: School A and School B. However, School A will have a totally separate instance of your app, database and set of supporting infrastructure. The diagram below shows how this works.
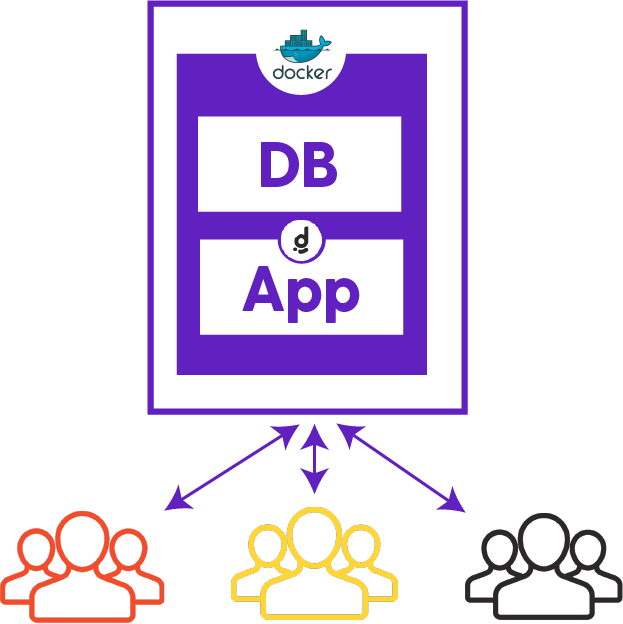
Multi-tenant cloud architecture is one where a single software instance, database and its supporting infrastructure serves multiple customers (i.e. tenants). In this second case, you will have multiple customers all connected to one set of supporting infrastructure. Each customer will have groups of one or more users.
The real-estate analogy is often used to explain the difference between single and multi tenant architectures. In a single tenant architecture each customer lives alone in their own single apartment building or house. The single apartment building or house will have its own security system and facilities and is entirely isolated from other buildings either side of it.
Conversely, in a multi-tenant architecture, tenants will all live in the same building. They share the same security system and communal facilities and entrance. However, each tenant has their own apartment, with their own private key, so that their privacy is guaranteed inside their apartment. In this case, the activities of other tenants in the apartment building are more likely to have an impact on the overall comfort of living in the shared building. For example, a noisy neighbour.
Most companies will opt for a multi-tenant environment where possible. This is because it is usually much less expensive and less complex to manage than having lots of single tenant set ups. Furthermore, if architected correctly, each customer’s data will stay completely private. That said, whilst customers cannot see each other’s data, they do all live in the same database and the same computer processes all this data. So it is not segregated in any way.
To learn more about the benefits of single tenant vs multi tenant solutions, read “benefits of single vs multi tenant apps”.
It is possible to create both single tenant and multi tenant solutions inside Dittofi. Before you’re going to be able to do this, we recommend that you compete our Quick Start and Dittofi Essentials guides.
In the next section, we are going to show you how to set up a multi tenant app in Dittofi. You can turn the multi tenant solution into a single tenant solution by using the Dittofi code export function and setting it up on a single server. For a description of how to export and own your apps code read this article.
We will keep this article short just to give an overview of how mutli tenancy works on Dittofi, however for a complete step by step guide and video tutorials read how to set up a basic multi tenant app on Dittofi in our developer docs.
Please note that there are other ways to architect your Dittofi app for multi tenancy, but this is the most straightforward way. For a complete understanding of how to achieve this for your app, you can speak to an expert or sign up to Dittofi for a free trial and experiment yourself.
As we have seen, in a multi tenant app, you will have multiple tenants (or customers) accessing one database and supporting infrastructure. Each one of these tenants will have their own separate data and that data would be logically separated from the other tenants. This means that one tenant can login and see their own data, whereas another tenant can login and see their own data, but neither can see each other’s data.
As mentioned earlier in the article, a tenant could be a customer, or a tenant could be a user at that customer’s site. However we want to think about it, the central point is that all tenants data have their data logically separated from other tenants data.
To set up a multi tenant architecture on Dittofi you need to complete the following steps.
Let’s start with two tables inside of our database: a Users Table with fields for username and password and a Books Table with a title and a creator_id. These are shown below.

Next, we are going to link these tables together so that the Id in the Users table is associated with the creator_id in the Books table. As you can see below.
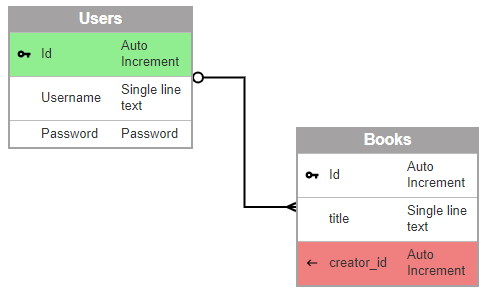
Our objective is to use this association to ensure that only books where the creator_id for the book matches the user id for the user will be displayed to the user with the matching user id.
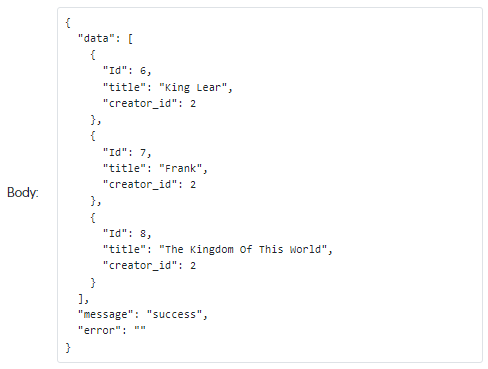
For instance, the books with the titles 100 years of solitude, The Sirens of Titan and The Autumn of the Patriarch all have the creator_id equal to 1. These books will only be displayed to the user with the Username james.virgo who has the Id 1. Similarly the books with the titles King Lear, Frank and The Kingdom Of This World all have the creator_id of 2, will only be displayed to the user with the Id of 2 which is, in our case, samuel.virgo.

After joining up the tables, we are going to auto generate endpoints for authentication. These will be used to password protect certain endpoints and ensure that only authenticated users from our Users Table are able to access the books stored inside the Books Table that are associated with the user by the Id in the Users Table.
To quickly do this, let’s auto generate the Sign Up, Login, Logout and Reset Password endpoints. These endpoints are now available to test and run on your endpoints tab, as shown below.

Next, let’s create some new endpoints to get lists of Books out of our Books Table ONLY where the user Id field in our Users Table is equal to the createor_id field in our Books Table.
To do this, first create a new endpoint as below. Make sure to lock the endpoint down using the “Authentication Profile” that we created in Step 2.
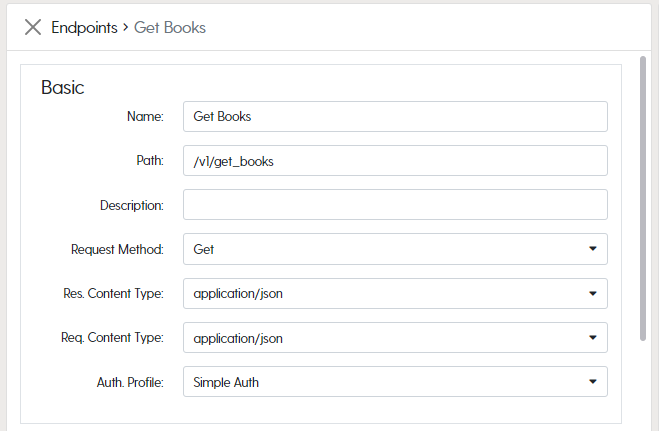
Next, create a Get Books Action, link the action to our Get Books Endpoint and add a variable that we will return to our endpoint that will ONLY return data where the creator_id is equal to our CurrentUser.id field. This where clause is highlighted in the screenshot below.
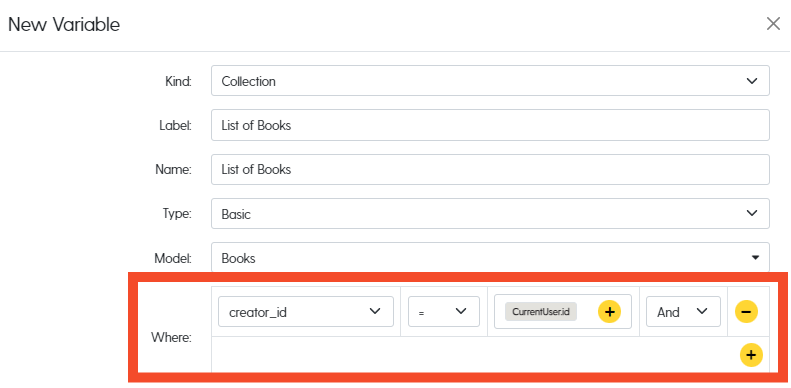
** Note ** the CurrentUser.id is a Global Variable that was automatically created in Step 2 when we auto generated our app endpoints. This variable is only made available to actions that are linked to endpoints that are locked down by the Authentication Profile.
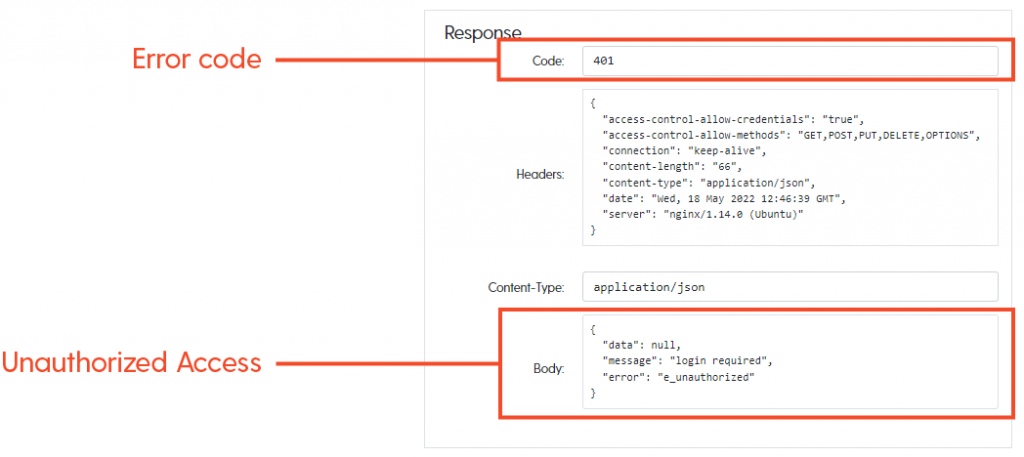
Once you’ve generated your code, you need to test your app. If we first test our Get Books endpoint without logging in, we will get a 401 Error Code back and the message in our request Body “Unauthorized Access” (as shown below). This is because the user has not yet logged in.
If you run the login endpoint for a User and enter the correct user name and password to login the user, and then second re-run your Get Books endpoint, you will get the books data where the creator_id is equal to the id of the logged in user. This means that ONLY one user is able to access this data. You can see this below for a who has a User with the User ID of 1. Notice all of the books that are returned have the creator_id set equal to 1.
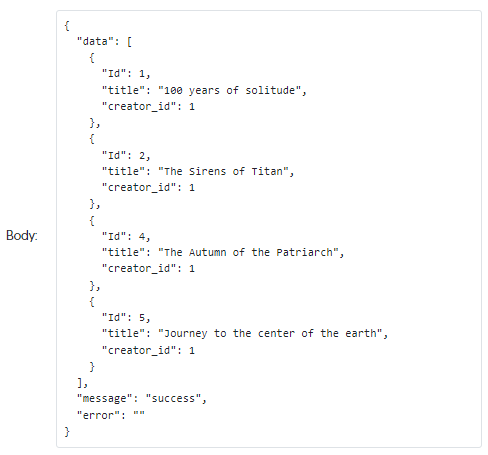
And below here, you can see this for the User with the User ID of 2. Notice that all of the books have the creator_id 2.
Picking the right architecture for your app is important. Furthermore, it is important to select a technology that will allow you to go in both directions so that you’re not locked into one solution or the other. This makes most no-code / app builder platforms inappropriate solutions for app development, since no-code platforms (A) do not allow you ownership over your apps code and (B) if they do allow for code exports, the code is built on antiquated tech stacks which are difficult to adapt for different architectures.
Dittofi is a great solution for both single tenant and multi tenant apps since Dittofi gives you 100% flexibility in terms of what app architecture can be achieved. This is not only because of the flexibility of the Dittofi architecture, but also because Dittofi gives you access to your apps code base, which is built on a very modern, cutting edge tech stack.
Both the code ownership AND the choice of tech stack allows you to host your system with Dittofi OR set up your system anywhere in the world as either single tenant or multi tenant solution. Furthermore, the choice of tech stack that Dittofi gives you provides maximum flexibility to meet your clients needs since it can be run on ANY operating system, cloud provider or physical hardware without any adaptation. This is not the case for less modern tech stacks like .NET, C++ and so on, which, even if you own the code, will need to be adapted according to the operating systems that you choose to run your final solution on.


Which no-code platforms export code in 2025?
Which no-code platforms export code in 2023? By James Virgo No-code is great for rapid app development, but no-code has been proven to be shockingly
Relationships in SQL – complete guide with examples
Relationships in SQL – complete guide with examples By James Virgo In this article we take a look at the different types of database relation
How to create database joins inside Dittofi hybrid no-code app builder
How to create database joins inside Dittofi’s no-code app builder By James Virgo One of the central concepts in database design is “database joins”. A
⸺ Receive the latest news
Get notified about new articles and events